
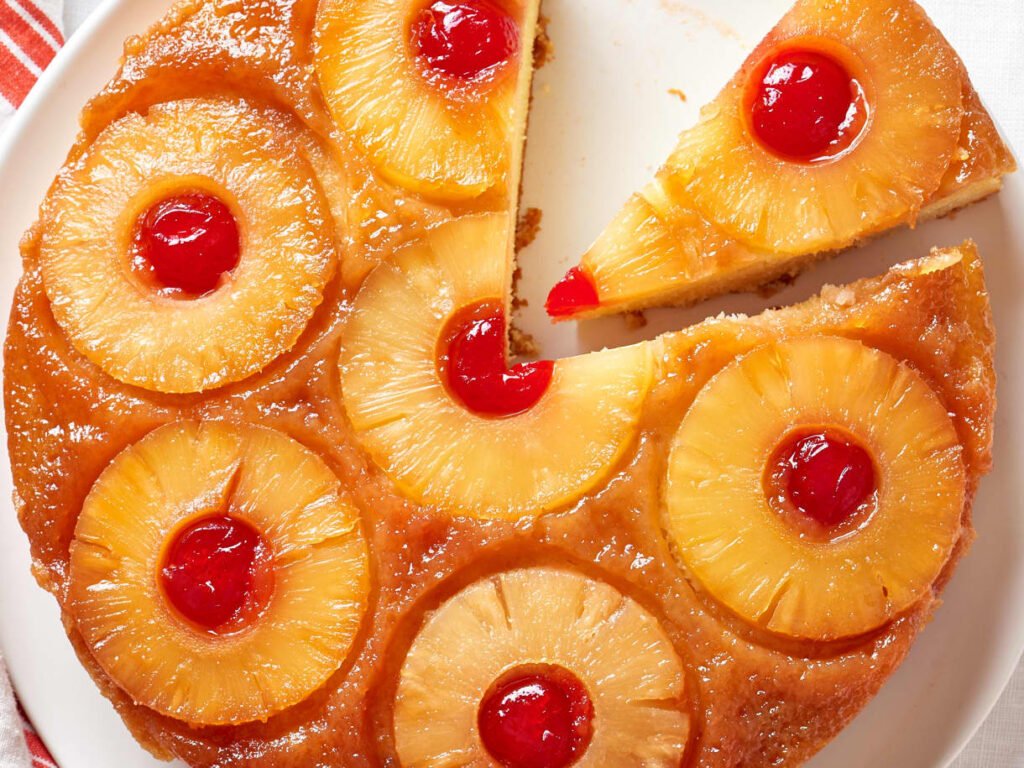
You flip it over, hold your breath for a second, and suddenly there it is — golden caramelized pineapple rings, glistening brown sugar glaze, and the kind of cake that makes people ask for the recipe before they’ve even finished their slice.
I’ve made a lot of cakes. This one has a way of making even people who “don’t really eat dessert” go back for seconds.
And here’s the thing: it looks incredibly impressive, but it’s actually one of the more forgiving cakes you can make. No frosting. No decorating. The presentation does itself.
So if you’ve never made one, now is a great time.
What You’ll Need
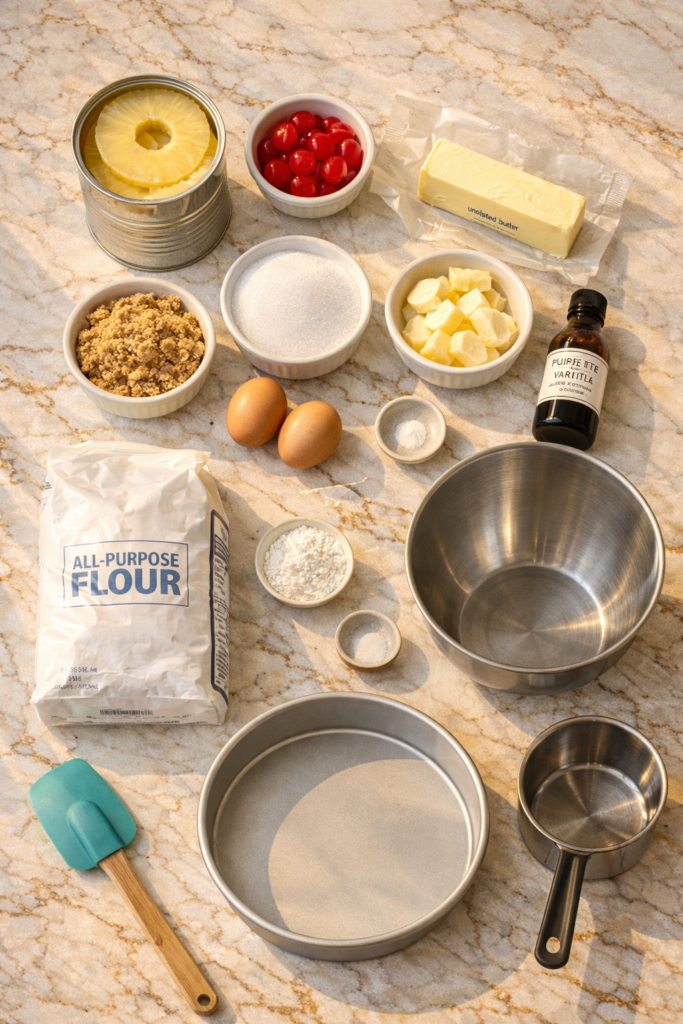
For the Caramel Topping
- 4 tablespoons (57g) unsalted butter
- ⅔ cup (133g) packed light brown sugar
- 1 can (20 oz / 567g) sliced pineapple rings in juice (about 7 rings), juice reserved
- 7 maraschino cherries (optional, but classic)
For the Cake Batter
- 1 ½ cups (190g) all-purpose flour
- 1 ½ teaspoons baking powder
- ¼ teaspoon salt
- ½ cup (113g) unsalted butter, softened to room temperature
- ¾ cup (150g) granulated white sugar
- 2 large eggs, room temperature
- 1 teaspoon pure vanilla extract
- ½ cup (120ml) reserved pineapple juice (from the can)
Tools You’ll Need
- 9-inch (23cm) round cake pan (NOT a springform pan — it will leak)
- Stand mixer or hand mixer
- Medium mixing bowl
- Small saucepan
- Rubber spatula
- Cooling rack
- Serving plate or cake stand
Pro Tips
1. Use the pan to make the caramel directly. Melt the butter and brown sugar right in the cake pan over low heat on the stovetop. It saves dishes and gets the caramel to coat the bottom evenly before the pineapple even goes in.
2. Pat the pineapple rings completely dry. Extra moisture from the canned pineapple can make the top (which becomes the bottom of the cake) soggy instead of caramelized. A quick press with paper towels makes a big difference.
3. Room temperature ingredients are non-negotiable. Cold butter won’t cream properly, and cold eggs can make the batter curdle. Pull everything out 30-45 minutes before you start.
4. Don’t wait to flip it. Once the cake is out of the oven, let it cool for exactly 5-10 minutes — no longer. If you wait too long, the caramel hardens and the cake sticks. Set a timer.
5. Watch your oven temperature. Ovens run hotter or cooler than the dial says. If your cake is browning on top before the center is set, tent it loosely with foil. An oven thermometer is a solid investment for any baker.
Substitutions and Variations
Fruit swaps: You’re not locked into pineapple. Peaches, plums, pears, or even mango all work beautifully with the same brown sugar base. Stone fruits especially caramelize like a dream.
Dairy-free: Swap the butter for vegan butter (like Miyoko’s or Earth Balance) and use full-fat coconut milk in place of pineapple juice for a slightly tropical twist.
Gluten-free: A 1:1 gluten-free flour blend works here. Just make sure it contains xanthan gum for structure.
Spiced version: Add ½ teaspoon of cinnamon and a pinch of nutmeg to the batter for a warmer, more autumnal flavor profile.
Fresh vs. canned pineapple: Fresh pineapple can absolutely be used, sliced about ¼ inch thick. Just note that fresh pineapple contains bromelain, an enzyme that can prevent gelatin from setting — not an issue here, but something to keep in mind for other recipes. You’ll also need to make a quick simple syrup (equal parts sugar and water) to replace the reserved can juice.
Make-Ahead Tips
- The caramel layer can be made the night before. Press the pineapple rings in, cover tightly with plastic wrap, and refrigerate. Take it out 30 minutes before adding batter so the pan comes to room temperature.
- The full cake can be baked, flipped, and stored at room temperature (tightly covered) for up to 2 days. The caramel actually gets more deeply flavored by day two.
- If you want to prep the dry ingredients ahead, whisk the flour, baking powder, and salt together and store in an airtight container for up to a week.
Nutritional Info (Per Slice, Based on 10 Slices)
| Nutrient | Amount |
|---|---|
| Calories | ~320 kcal |
| Carbohydrates | 47g |
| Sugar | 30g |
| Fat | 13g |
| Saturated Fat | 8g |
| Protein | 3g |
| Fiber | 1g |
These are estimates and will vary based on exact ingredients used.
How to Make Pineapple Upside Down Cake
Step 1: Preheat and Prep
Preheat your oven to 350°F (175°C).
Drain the can of pineapple rings and reserve ½ cup of the juice — you’ll use it in the batter. Pat the pineapple rings dry with paper towels and set aside.
Step 2: Make the Caramel Base
Place your 9-inch cake pan directly on the stovetop over medium-low heat.
Add the 4 tablespoons of butter and let it melt completely. Sprinkle in the ⅔ cup of brown sugar and stir gently until it’s combined and just starts to bubble — about 2 minutes.
Remove from heat immediately. Don’t let it cook too long or it’ll harden before the cake even goes in.
Step 3: Arrange the Pineapple
Place one pineapple ring in the center of the pan.
Arrange the remaining rings around it in whatever pattern fits. Place a maraschino cherry in the center of each ring if using. Set the pan aside.
Step 4: Make the Batter
In a medium bowl, whisk together the flour, baking powder, and salt. Set aside.
In a separate large bowl (or stand mixer bowl), beat the softened butter and granulated sugar together on medium-high speed for 3-4 minutes until pale and fluffy. This step matters more than most people realize — it’s what makes the cake light.
Add the eggs one at a time, beating well after each addition. Mix in the vanilla extract.
Reduce speed to low. Add the flour mixture and the reserved pineapple juice in three alternating additions, starting and ending with the flour. Mix just until combined — don’t overmix or the cake will be dense.
Step 5: Bake
Gently pour the batter over the pineapple layer in the pan. Use a spatula to spread it evenly, being careful not to disturb the fruit.
Bake for 40-45 minutes, or until a toothpick inserted into the center comes out clean and the edges are pulling slightly away from the sides of the pan.
Step 6: The Flip
Let the cake cool in the pan for exactly 5-10 minutes — set a timer.
Run a thin knife around the edges of the pan to loosen it. Place your serving plate upside down on top of the pan. Using oven mitts, hold both the plate and pan firmly together and flip in one confident motion.
Leave the pan sitting on top for 30 seconds so the caramel can drizzle down onto the cake. Then slowly lift the pan off.
If a piece sticks, just use a spatula to place it back. No one will know once it’s served 😉
Step 7: Serve
Serve warm or at room temperature. A dollop of unsweetened whipped cream or a scoop of vanilla ice cream alongside it is completely optional, but also completely worth it.
Leftovers and Storage
- Room temperature: Cover with plastic wrap or a cake dome and store for up to 2 days. The caramel firms up a bit, but the flavor deepens.
- Refrigerator: Store in an airtight container for up to 5 days. Bring to room temperature before serving, or warm individual slices in the microwave for 15-20 seconds.
- Freezer: Wrap individual slices tightly in plastic wrap, then in foil. Freeze for up to 2 months. Thaw overnight in the fridge.
Reheating tip: A few seconds in the microwave brings the caramel back to that just-baked glossy texture. Don’t skip this step if you’re eating leftovers.
Frequently Asked Questions
Can I use a cast iron skillet instead of a cake pan? Yes — a 10-inch cast iron skillet works great and gives even more caramelization. Just note the baking time may be slightly shorter (check at 35 minutes).
My caramel hardened before I could flip the cake. What do I do? Put the pan (still with cake inside) back in the oven for 3-5 minutes at 350°F. The caramel will loosen again. Then flip immediately.
Why is my cake soggy on top (which becomes the bottom)? Almost always comes down to two things: not patting the pineapple dry enough, or not letting the caramel set up properly before adding batter. Both are easy fixes for next time.
Can I double the recipe? You can, but bake two separate 9-inch cakes rather than trying to scale into a larger pan. The baking time won’t translate well with a bigger pan.
Do I have to use maraschino cherries? Not at all. They’re purely decorative and traditional. Some people leave them out entirely. Others use fresh cherries, dried cranberries, or small pieces of pecan instead.
Can I make this in a bundt pan? Technically yes, but it’s tricky. The caramel doesn’t coat a bundt pan as evenly and the flip is much more precarious. Stick to a round cake pan for best results.
Wrapping Up
Here’s what I love about this cake: it requires zero decorating skills, zero special equipment beyond a basic round cake pan, and it somehow looks like you spent way more time on it than you did.
The caramelized pineapple, the golden brown sugar glaze, the soft buttery crumb — it all just comes together in the most satisfying way.
Give it a go this week. And when you do, come back and tell me how it turned out. Did you try a fruit swap? Did you serve it warm with ice cream? Any questions from the kitchen? Drop a comment below — I read every single one. 🍍