
You know that cake people keep asking you to bring to every party, every birthday, every “just because” gathering?
This is it.
A from-scratch vanilla cake that’s so soft, so moist, and so ridiculously flavorful, boxed mix won’t even cross your mind again. And before you think this is one of those intimidating, pastry-chef-only recipes — it’s really not.
It’s simple, it’s approachable, and it tastes like something you’d pay $10 a slice for at a fancy bakery.
Fair warning though: once you make this once, you’re the designated cake person in your friend group. Forever. 🎂
What You’ll Need
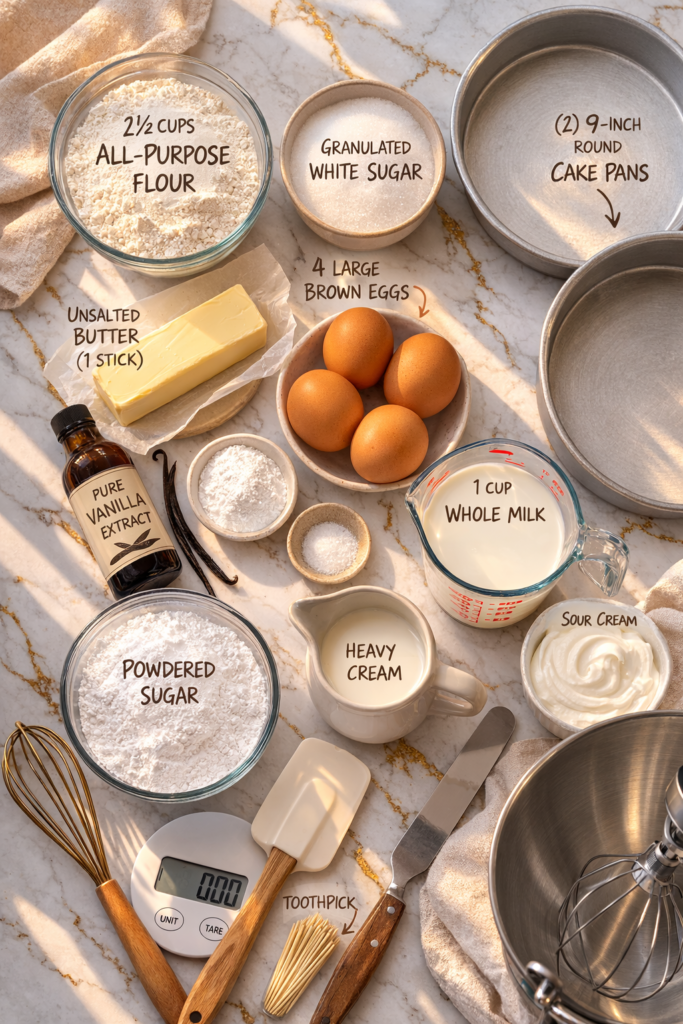
For the Cake:
- 2 ½ cups (315g) all-purpose flour
- 2 ½ tsp baking powder
- ½ tsp fine sea salt
- 1 cup (226g) unsalted butter, softened to room temperature
- 1 ¾ cups (350g) granulated white sugar
- 4 large eggs, room temperature
- 1 tbsp pure vanilla extract (not imitation — this matters more than you think)
- 1 cup (240ml) whole milk, room temperature
- ¼ cup (60ml) sour cream, room temperature
For the Vanilla Buttercream:
- 1 ½ cups (340g) unsalted butter, softened
- 5 cups (600g) powdered sugar, sifted
- 3–4 tbsp heavy cream
- 2 tsp pure vanilla extract
- Pinch of fine sea salt
Tools You’ll Need
- Two 9-inch round cake pans
- Stand mixer or hand mixer
- Large mixing bowls
- Rubber spatula
- Whisk
- Measuring cups and spoons
- Kitchen scale (highly recommended for accuracy)
- Offset spatula or butter knife for frosting
- Wire cooling rack
- Parchment paper
- Toothpick or cake tester
Pro Tips
These are the things that separate a good cake from a great one.
1. Room temperature everything — and I mean everything. Cold butter, cold eggs, cold milk — they don’t mix together properly. The batter can curdle and your layers end up dense. Pull everything out 1 to 2 hours before you start.
2. Don’t skip the sour cream. This is the secret ingredient most vanilla cake recipes leave out. Sour cream adds fat and a very subtle tang that makes the crumb incredibly tender. You won’t taste the sourness, but you’ll absolutely feel the difference in texture.
3. Measure flour by weight, not volume. A packed cup of flour versus a properly spooned cup can be a 30–40% difference. That’s the difference between a fluffy cake and a dense brick. Use a kitchen scale if you have one.
4. Don’t overmix once the flour goes in. Mix just until the batter is combined and no flour streaks remain. Overmixing develops gluten, and gluten in cake = tough layers.
5. Cool the layers completely before frosting. Even slightly warm cake will melt your buttercream and you’ll end up with a sliding, soupy mess. It needs to be fully cool — no shortcuts here.
How to Make It

Step 1: Prep Your Pans and Oven
Preheat your oven to 350°F (175°C).
Grease two 9-inch round cake pans with butter, then line the bottoms with parchment circles. Grease the parchment too. This ensures a clean release every time.
Step 2: Mix the Dry Ingredients
In a medium bowl, whisk together the flour, baking powder, and salt.
Set aside.
Step 3: Cream the Butter and Sugar
In your stand mixer with the paddle attachment (or using a hand mixer), beat the softened butter and sugar together on medium-high speed for 4 to 5 full minutes.
This step is not one to rush. You want the mixture to look pale, almost white, and noticeably fluffy. This is what gives the cake its lift.
Step 4: Add the Eggs and Vanilla
Add the eggs one at a time, beating well after each addition.
Then mix in the vanilla extract. The batter might look slightly curdled at this point — that’s okay, it comes together once you add the dry ingredients.
Step 5: Alternate Dry and Wet Ingredients
With the mixer on low speed, add the dry ingredients in three additions, alternating with the milk and sour cream mixture (combined together) in two additions.
Start and end with the dry ingredients: dry → wet → dry → wet → dry.
Mix just until each addition is incorporated. Once the last bit of flour is in, stop mixing.
Step 6: Bake
Divide the batter evenly between your two prepared pans. Smooth the tops with a spatula.
Bake for 28 to 32 minutes, or until a toothpick inserted in the center comes out clean or with just a few moist crumbs.
Let the cakes cool in their pans for 10 minutes, then turn them out onto a wire rack to cool completely.
Step 7: Make the Buttercream
Beat the softened butter on medium-high for 3 to 4 minutes until it’s pale and fluffy.
Add the sifted powdered sugar, one cup at a time, mixing on low after each addition. Then add the heavy cream, vanilla, and salt.
Beat everything together on medium-high for another 2 minutes until the frosting is light and spreadable. If it’s too thick, add more cream a tablespoon at a time.
Step 8: Assemble and Frost
Place one cake layer on your serving plate or cake board.
Spread a generous layer of buttercream on top. Place the second cake layer on top, then frost the top and sides.
A crumb coat (thin first layer of frosting, then chill 15 minutes, then add the final layer) gives you that clean bakery finish — but totally optional if you’re going for a more rustic look.
Substitutions and Variations
Cake flour instead of all-purpose: Gives you an even more tender, delicate crumb. Use the same amount.
Dairy-free: Swap the butter for vegan butter, milk for full-fat oat milk, and sour cream for dairy-free yogurt. The texture is slightly different but still really good.
Almond extract: Replace half the vanilla with almond extract for a warmer, nuttier flavor profile.
Lemon vanilla: Add 1 tablespoon of lemon zest to the batter and a teaspoon of lemon juice to the frosting. Bright, fresh, and completely delicious.
Different pan sizes: This recipe also works in a 9×13 inch sheet pan (bake for 35 to 40 minutes) or as 24 cupcakes (bake for 18 to 22 minutes).
Make Ahead Tips
The cake layers can be baked up to 2 days ahead. Wrap them tightly in plastic wrap once fully cooled and store at room temperature.
The buttercream keeps well in an airtight container in the fridge for up to 5 days. When ready to use, let it come back to room temperature and beat briefly to bring it back to a smooth consistency.
The assembled cake can be made the night before serving. Cover loosely and keep at room temperature if serving within 24 hours.
Nutritional Breakdown (Per Slice, Serves 12)
| Nutrient | Amount |
|---|---|
| Calories | ~520 kcal |
| Total Fat | 28g |
| Saturated Fat | 17g |
| Carbohydrates | 65g |
| Sugar | 48g |
| Protein | 5g |
| Sodium | 180mg |
Values are approximate and based on standard ingredient brands.
Meal Pairing Suggestions
This cake pairs really well with:
- A scoop of vanilla bean or strawberry ice cream on the side
- Fresh berries (strawberries and raspberries especially)
- A drizzle of warm salted caramel sauce
- A hot cup of coffee or an afternoon tea
If you’re serving it at a dinner party, a light main course like pasta primavera or a simple grilled chicken salad beforehand keeps the focus on the dessert — where it belongs.
Leftovers and Storage
Room temperature: Store covered under a cake dome or in an airtight container for up to 3 days.
Fridge: The cake keeps for up to 5 days refrigerated. Bring slices back to room temperature before eating — cold cake is noticeably denser and less flavorful.
Freezer: Freeze individual slices wrapped in plastic wrap and placed in a zip-lock bag for up to 3 months. Thaw overnight in the fridge, then bring to room temperature before serving.
FAQ
Can I use salted butter instead of unsalted? You can, but then skip the added salt in both the cake and frosting. Unsalted butter gives you full control over the flavor.
My cake sank in the middle — what happened? Usually one of three things: the oven wasn’t fully preheated, the oven door was opened too early (before the 25-minute mark), or the baking powder is old. Test your baking powder by dropping a teaspoon into hot water — if it bubbles vigorously, it’s still active.
Can I make this as a 3-layer cake? Yes. Use three 8-inch round pans instead of two 9-inch pans and reduce the baking time by about 5 minutes. You may also want to make 1.5x the buttercream recipe.
Why does my frosting look greasy? Your butter was probably too warm. If this happens, pop the frosting in the fridge for 15 minutes, then beat again.
Can I add food coloring to the batter? Absolutely. Gel food coloring works best and won’t thin out the batter the way liquid coloring does.
Can I use a different frosting? Of course. Cream cheese frosting is a popular swap and pairs beautifully with the vanilla flavor. Swiss meringue buttercream is another great option if you want something less sweet.
Wrapping Up
This vanilla cake doesn’t need fancy techniques or hard-to-find ingredients to be exceptional.
It just needs good butter, real vanilla, and a little patience with the process.
Once you make it, you’ll realize how much better scratch baking actually tastes — and how worth it every single step is when you cut into that first slice.
Give it a try this weekend, and then come back and drop a comment below. I love hearing how it goes — and if you made any fun variations, share those too! 🍰